If your system is listed below there is a restore to factory settings function. The links are clickable
DELL
LENOVO (IBM)
ACER This will download the E-Recovery Zip file. Unzip, then run.
So you are going to reformat and re-install Windows ?
Note added by WTT
Note: If you intend to use the following tutorial as a guide when re-formating your drive and re-installing your Operating System, we strongly suggest you print out the tutorial and keep it handy throughout the entire procedure. To access a "printer-friendly" version of this material, please click on the "Options" button which is located on the far right of your screen and choose "Print this topic" from the drop down menu. Then print out this version using the print function available through your browser.
Preparation is the secret to success so we shall start there :
PREPARATION
1. Ensure you have the following discs
A. Operating System disc or Manufacturers recovery disc.
B. Windows KEY found either in the disc holder for the Windows CD or in a sticker on the side of your system
C. Motherboard drivers disc.
D ISP disc with Modem/DSL drivers and setup.
E. Programme installation discs (i.e. Word, Photo editing etc.) If you have no discs but downloaded them from the Internet then see below.
2. Things to back up for an easy transition. First create a BACKUP folder on your desktop with the following subfolders :
VIDEOS/MUSIC/PICTURES
DOCS
LICENCES
PROGRAMS
To create one on your desktop right click a blank space > select NEW > select FOLDER. To create subfolders open the backup folder and on the file menu select new folder
How to back up Outlook Express items
Step 1: Copy message files to the backup folder
Step A: Locate the Store folder
1. Start Outlook Express.
2. Click Tools, and then click Options.
3. On the Maintenance tab, click Store Folder.
4. In the Store Location dialog box, copy the store location. To do this, follow these steps:
a. Put the mouse pointer at one end of the box under the Your personal message store is located in the following folder box.
b. Press and hold the left mouse button, and then drag the mouse pointer across the Your personal message store is located in the following folder box.
c. Press CTRL+C to copy the location.
5. Click Cancel, and then click Cancel again to close the dialog box.
Step B: Copy the contents of the Store folder
1. Click Start, click Run, press CTRL+V, and then click OK.
2. On the Edit menu, click Select All.
3. On the Edit menu, click Copy, and then close the window.
Step C: Paste the contents of the Store folder into the backup folder
1. Double-click the Mail Backup folder to open it.
2. Right-click inside the Mail Backup folder window, and then click Paste.
Step 2: Export the Address Book to a .csv file
Important Make sure that you follow this step if you use multiple identities in Outlook Express.
Microsoft Outlook Express 5.x and Microsoft Outlook Express 6.0 use a Windows Address Book (.wab) file to store Address Book data. The individual data for each identity is stored in a folder by user name within the .wab file that is used.
The only way to separate the Address Book data for different identities is to export the data to a .csv file while you are logged in as a specific identity. If the .wab file becomes dissociated from the user identities, the data can be exported only as one total. In this case, the data cannot be exported folder by folder.
There is another reason to export the .wab file to a .csv file. If the .wab file not exported to a .csv file, but the .wab file is shared with Microsoft Outlook, the addresses are stored in the personal folders (.pst) file in Outlook. When you export the file to a .csv file by using the File menu in Outlook Express, the correct contacts are exported. However, if the Address Book is shared with Outlook, you cannot use the File menu option to export from the Address Book. This option is unavailable.
To export the Address Book to a .csv file, follow these steps:
1. On the File menu, click Export, and then click Address Book.
2. Click Text File (Comma Separated Values), and then click Export.
3. Click Browse.
4. Select the Mail Backup folder that you created.
5. In the File Name box, type address book backup, and then click Save.
6. Click Next.
7. Click to select the check boxes for the fields that you want to export, and then click Finish.
8. Click OK, and then click Close.
Step 3: Export the mail account to a file
1. On the Tools menu, click Accounts.
2. On the Mail tab, click the mail account that you want to export, and then click Export.
3. In the Save In box, select the Mail Backup folder, and then click Save.
4. Repeat these steps for each mail account that you want to export.
5. Click Close.
Step 4: Export the newsgroup account to a file
1. On the Tools menu, click Accounts.
2. On the News tab, click the news account that you want to export, and then click Export.
3. In the Save In box, select the Mail Backup folder, and then click Save.
4. Repeat these steps for each news account that you want to export.
5. Click Close.
Favorites/bookmarks
To export the Favorites folder, follow these steps:
1. Start Internet Explorer
2. On the File menu, click Import and Export, and then click Next.
3. Click Export Favorites and then click Next.
4. Click Favorites and then click Next.
5. Type the name of the file that you want to export the favorites to. By default, the export file is named Bookmark.htm.
6. Select the folder to backup in as your newly created one
7. Click Next and then click Finish.
Personal Documents
1. Open your document processing program
2. Select options
3. Generally there will be the option to select your save folder
4. Change this to the backup subfolder
5. Save all your files to this location
Videos/Pictures
1. Right click your music file folder(s) and select copy
2. Right click the backup folder and select paste
3. Repeat until all folders are copied to the backup folder
License numbers from installed software
1. Start each program that you have a license for
2. In the main menu select HELP > ABOUT
3. Generally this is where you will find your license key
4. Copy the key to a text file along with the program name and save to the backup folder
Latest version of your Anti-virus and Firewall
Download the latest version from the website and save to your backup folder
Download all installed programs that you wish to keep and do not have disc for
Download the latest version from the website and save to your backup folder
Now you have completed that you will need to copy the entire contents of your new folder to one of the following : USB stick or CD/DVD disc
To do this right click the backup folder and select copy
Then right click the drive (CD or USB) that you are saving to and select paste
FORMATING PARTITIONING AND INSTALLING
This will totally wipe your hard drive and re-install a fresh copy of Windows. Depending on the original version you have you may need to download SP2, and you will definitely need all the windows updates. To this end you will need to install your Antivirus and Firewall before even attempting to go online.
1. Insert the Windows XP CD into your computer and restart your computer.
2. If prompted to start from the CD, press SPACEBAR. If you miss the prompt (it only appears for a few seconds), restart your computer to try again.
3. Windows XP Setup begins. During this portion of setup, your mouse will not work, so you must use the keyboard and it should preferebly be a PS2 keyboard s your USB ports may not be operational.
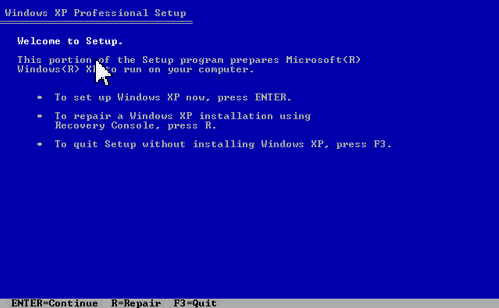
4. On the Welcome to Setup page, press ENTER.
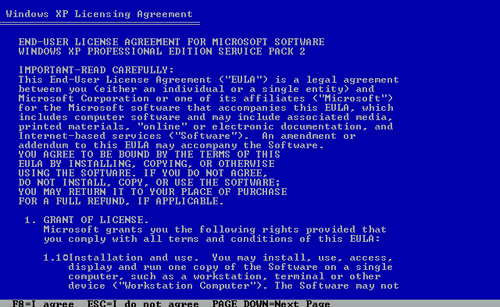
5. On the Windows XP Licensing Agreement page, read the licensing agreement. Press the PAGE DOWN key to scroll to the bottom of the agreement. Then press F8.
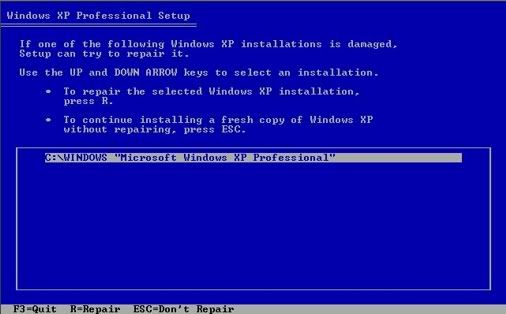
Step 6a: If Windows setup recognizes an existing installation of Windows on your hard drive, you will be shown the screen below. Otherwise, skip down to Step 6b. Windows has the ability to perform a repair install or start over with a fresh copy of Windows. Because this is a tutorial about performing a fresh install of Windows, press ESC, to continue installing a fresh copy of Windows without repairing.
Edited by Appleoddity, with permission from the original author. Added Step 6a. (07-20-09)
6b. This page enables you to select the hard disk drive on which Windows XP will be installed. Once you complete this step, all data on your hard disk drive will be removed and cannot be recovered. This will initially show your current Windows installation. Press D to delete the partition , and then press L when prompted. This deletes your existing data.
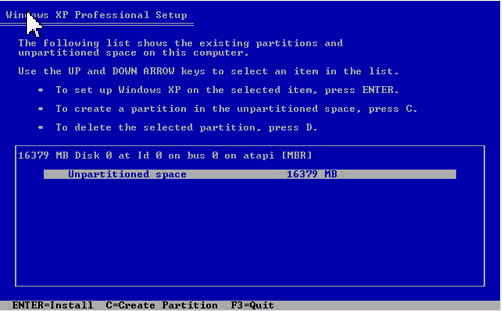
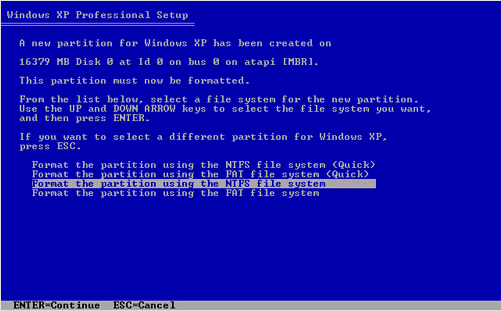
7. This page will be where you now format your hard drive after the deletion of old Windows. Select the option shown
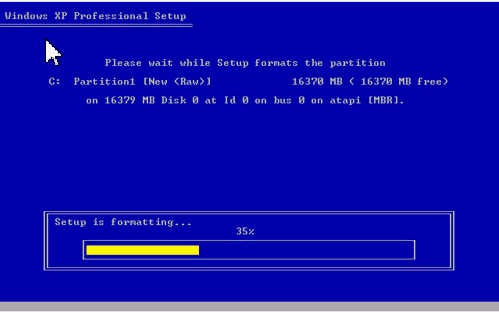
8. You will now see a progress bar as the disc is formated, go for a cup of tea as this will take a while.
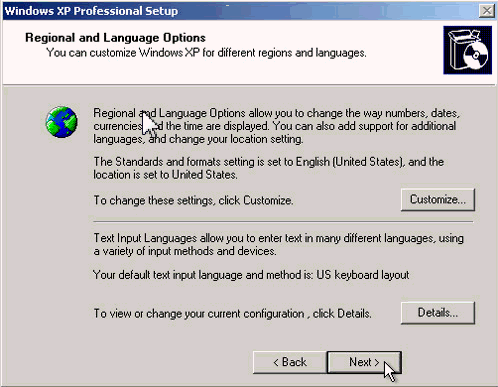
9. Now you will need to set up your keyboard for the right language and currency
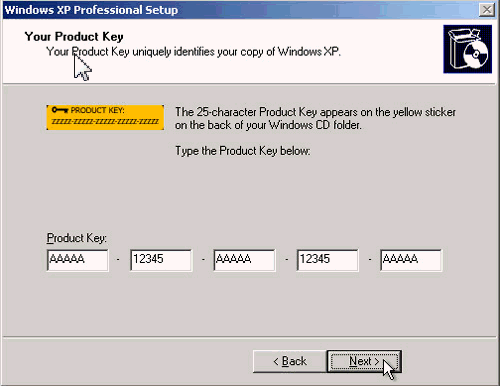
10. This is where you will enter your product key. This will be with the install disc or on a sticker on the side of your system
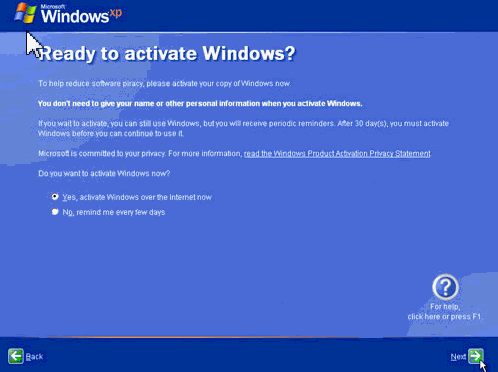
11.When you reach this stage then say activate later as we do not wish to go online yet.
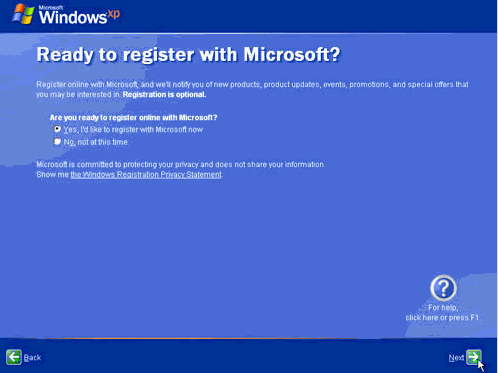
12. Again leave this one for now we will register later
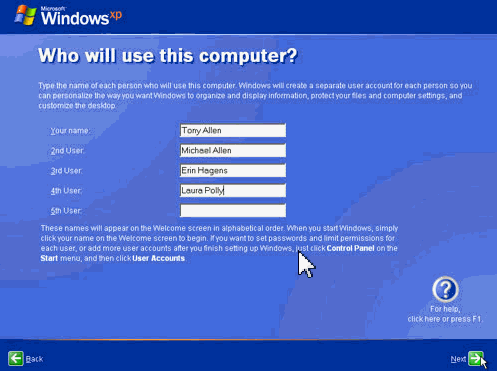
13. On this page set up the users that will be on your system
14. The system will now continue to load and you now have a clean system
PREPARATION FOR FIRST USE
1. If you need SP2 then insert the disc and install now, following the prompts
2. From your backup disc install the following:
a. Antivirus
b. Firewall
You will need to reboot for both programmes.
3. Install any required motherboard drivers (e.g. wireless etc.)
4. Install any required programmes from Disc or the backup folder.
5. Install your ISP disc if that is required to get you online.
6. Go online and Update :
a. Your Antivirus
b. Windows
NOW REINSTALL YOUR E_MAIL SETTINGS
How to restore Outlook Express items
Note To restore items when you use multiple identities in Outlook Express, you may have to re-create the identities before you follow these steps. Repeat each step as needed for each identity.
Step 1: Import messages from the backup folder
1. On the File menu, point to Import, and then click Messages.
2. In the Select an e-mail program to import from box, click Microsoft Outlook Express 5 or Microsoft Outlook Express 6, and then click Next.
3. Click Import mail from an OE5 store directory or Import mail from an OE6 store directory, and then click OK.
4. Click Browse, and then click the Mail Backup folder.
5. Click OK, and then click Next.
6. Click All folders, click Next, and then click Finish.
Step 2: Import the Address Book file
1. On the File menu, click Import, and then click Other Address Book.
2. Click Text File (Comma Separated Values), and then click Import.
3. Click Browse.
4. Select the Mail Backup folder, click the address book backup.csv file, and then click Open.
5. Click Next, and then click Finish.
6. Click OK, and then click Close.
Step 3: Import the mail account file
1. On the Tools menu, click Accounts.
2. On the Mail tab, click Import.
3. In the Look In box, select the Mail Backup folder.
4. Click the mail account that you want to import, and then click Open.
5. Repeat these steps for each mail account that you want to import.
6. Click Close.
Step 4: Import the newsgroup account file
1. On the Tools menu, click Accounts.
2. On the News tab, click Import.
3. In the Look In box, select the Mail Backup folder.
4. Click the news account that you want to import, and then click Open.
5. Repeat these steps for each news account that you want to import.
6. Click Close.
Import Favorites to Internet Explorer 6
1. In Internet Explorer 6, click File , and then click Import.....Export
2. In the Import/Export Wizard, click Next.
3. Select Import Favorites, and then click Next.
Note By default, Internet Explorer creates a Bookmark.htm file in your Documents folder. However, you can import favorites that are saved under another name. To do this, click Browse, select a file or type a location and file name, and then click Next. Alternatively, click Browse, and then click Next to accept the default.
4. Select the folder where you want to put the imported bookmarks, and then click Next.
5. Click Finish.
Edited by appleoddity, 20 July 2009 - 07:30 PM.


 This topic is locked


