

 Looks like you're enjoying the discussion, but you're not signed up for an account. When you create an account, we remember exactly what you've read, so you always come right back where you left off. You also get notifications, here and via email, whenever new posts are made. You can like posts to share the love.
  Join
Join 
Hardware Made Easy
HOWTO: Test your computer's physical memory for problems.
Using the Windows Memory Diagnostic
This tutorial will teach you how to use the freely provided Windows Memory Diagnostic utility to test your computer's physical memory for problems that could be causing you issues.
If you are experiencing problems such as lock ups, blue screens, weird video anomalies, or reboots, one of your problems could be your RAM. Ram will usually never go bad although it can happen. NEW memory can be bad out of the box and should always be tested before using it in your system. Older systems often times will get bad connections at the memory slots which will cause the same issues that bad memory will. Because it is such an easy test, it is always recommended that you eliminate the possibilty of RAM problems before spending time troubleshooting problems. Once you create the Windows Memory Diagnostic boot disk you can use it again and again, on any system, to make sure your systems run smoothly and reliably.
NOTE: You will need a floppy drive, or CD burner to create the bootable memory diagnostic disc. The software listed below will work on all versions of Windows from 95 on up although the exact steps may vary slightly.
NOTE: Windows Memory Diagnostic is a 32-bit program that will not read more than 4 gigs of RAM. It will work on systems with more than 4 gigs of RAM, but the RAM will not be fully tested.
Ok, lets get started!
Step 1: Download the Windows Memory Diagnostic from Microsoft.
To learn more about the Windows Memory Diagnostic, click HERE
- Click to download the Windows Memory Diagnostic
- When you are prompted with a Security Warning please choose to Run the software.
Firefox Users: Please Save the file, then Open it. - When the Windows Memory Diagnostic setup begins, please accept the End User License Agreement by clicking, Accept, and you will see the window below:
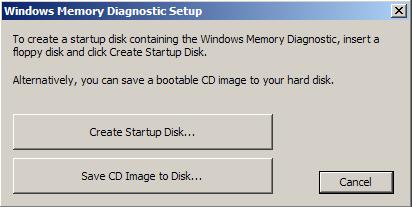
- You will need to decide if you are going to create a bootable Floppy Disc, or a bootable CD-Rom. Our recommendation is to create a bootable CD-Rom because many computers no longer have floppy disc drives. Please read the appropriate section below to create the type of disc you want to make.
Step 2a: Creating a bootable Floppy Disc.
You will need to have a blank floppy disc ready.
- Insert a blank floppy disc into your floppy disc drive.
- Click Create Startup Disk... in the Windows Memory Diagnostic Setup window.
- After a brief moment, you will see:
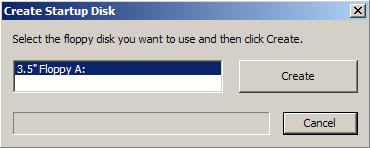
- Please choose the appropriate floppy disc drive, and click Create.
- If all goes well, in less than 30 seconds you will see a window that says, Floppy Created Successfully.
- Congratulations, you have created a bootable floppy disc to test your RAM. Close the Windows Memory Diagnostic setup, and read on.
Step 2b: Creating a bootable CD-Rom Disc.
You will need to have a blank CD-R disc ready.
- Click Save CD Image to Disk... in the Windows Memory Diagnostic Setup window.
- A Save CD Image dialog window will open asking you to choose where to save the windiag.iso file.
- Please navigate to your desktop and save the file.
- You will need to download the FREE ImgBurn to burn the .ISO image to disc:
NOTE: You may use any ISO capable burning software to create the disc. We will use ImgBurn for this tutorial.
How to download and install ImgBurn.
To learn more about ImgBurn, click HERE.
- Click to download ImgBurn.
- If you receive a security warning, choose to Run, or Open the ImgBurn executable.
- When the ImgBurn Setup Wizard window opens, click Next.
- Click Next two more times to accept the default installation options.
- Click Install to begin the installation process.
- If prompted about allowing ImgBurn to automatically check for updates, click No.
- In the Completing ImgBurn Setup window, uncheck Run ImgBurn and click Finish.
- Insert a blank CD-R disc into your CD burning drive.
- Because you used the default installation options for ImgBurn there will be an ImgBurn icon on your desktop.
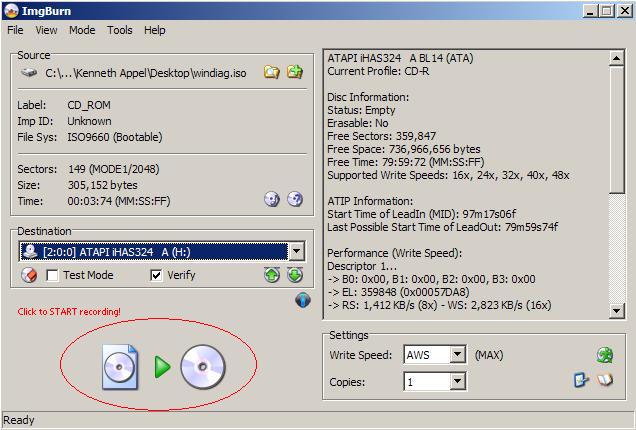
- Find the windiag.iso file on your desktop and click and drag and drop it on the ImgBurn icon.

- The ImgBurn window will open and if you have a valid CD-R in your drive you can click the "File to Disc" image to start the burning process as seen below:

- The burn process will complete with a successful message if all went well. Close ImgBurn.
Step 3: Testing your system's memory.
Well, that's all there is to downloading the Windows Memory Diagnostic and creating the necessary bootable media. Now comes the fun part. Testing your RAM. In order to start the Windows Memory Diagnostic you will have to boot the floppy or CD that you just created on your computer. All computers have the capability to boot from CD or Floppy. However, you may need to tell your computer to boot from a floppy or CD instead of your internal hard drive. The method for doing so varies from manufacturer to manufacturer. Many computers will automatically boot from a CD just by inserting the disc in the drive and rebooting your computer. If your computer does not boot the Windows Memory Diagnostic then you may need to press a special key immediately after your computer is turned on. It will often say, Press F10 for boot menu. Or, Press F2 to select boot device. You may also modify your BIOS settings to change the boot order permanently so that your computer will always be ready to boot from CD-Rom if a disc is inserted. If you are having trouble booting from a floppy or CD-Rom disc, I suggest you read the manual for your computer that should be listed at the manufacturer's website.
Once you get the Windows Memory Diagnostic started, it will look like this:
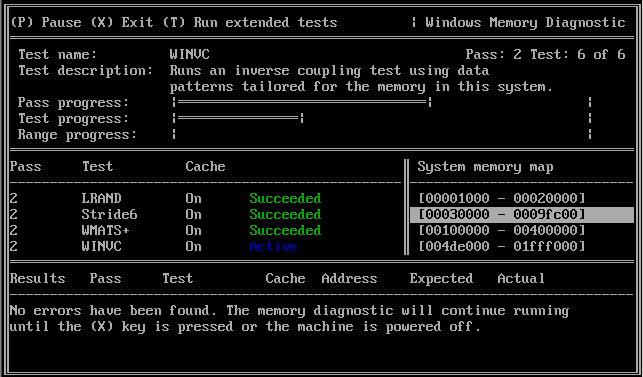
Let the test run through several passes in order to ensure that you are not having any memory issues with your computer. Several hours to overnight is recommended for stress testing. There should be NO errors found. If any errors are found they will be displayed at the bottom of the memory test window. Any errors at all will have to be corrected or you WILL have problems with your computer.
Making the most out of the Windows Memory Diagnostic:
Warning: Damage caused by improper handling of your computer components will void the warranty. If there are any questions about warranty on your computer please contact a qualified technician or the manufacturer before proceeding. Always be sure to unplug the power cord before servicing your computer. This is for your own safety, as well as, for the protection of your computer. Electrical devices are static sensitive. Necessary precautions should be taken to ensure that you ground yourself and eliminate any static build up. It is generally accepted that touching any large metal objects, such as your computer's case, will sufficiently discharge any static build up prior to working on your computer. You may want to invest in a grounding wrist strap to continually discharge any static build up.
- Any errors at all MUST be corrected either by reseating the RAM or replacing the bad memory.
- Many older computers will end up with bad connections on the RAM that may only reveal themselves when there is vibration or a temperature change in the computer. The metal contacts on the RAM and in the memory slots of your motherboard expand and contract as the computer heats up and cools down. Because of this, bad connections are common even on computers only a few months to a year old. In order to make sure your memory has a solid connection it is good practice to remove the side cover of your computer, locate your RAM, and tap on it gently with the plastic end of a screw driver while the diagnostic is running. (Important: We use the plastic end of a screwdriver to avoid electrical shock and shorts) If there are any bad connections the Windows Memory Diagnostic will crash, the screen will get garbled, the system will reboot, or you will receive memory errors. In order to fix these problems you will have to remove the memory from its slot (turn the computer off first!), and reinsert it (called reseating) to clean the connections. Once the memory has been reseated, repeat the above process to re-run the tests until no further problems are found. Sometimes, computers that are a few years old, can get oxidation on the memory connections. These problems can be stubborn, and simply reseating the RAM will not always fix the bad connection problem. An alcohol swab or electrical contact cleaner (found at the local hardware store) will do wonders for removing oxidation and cleaning the connections.
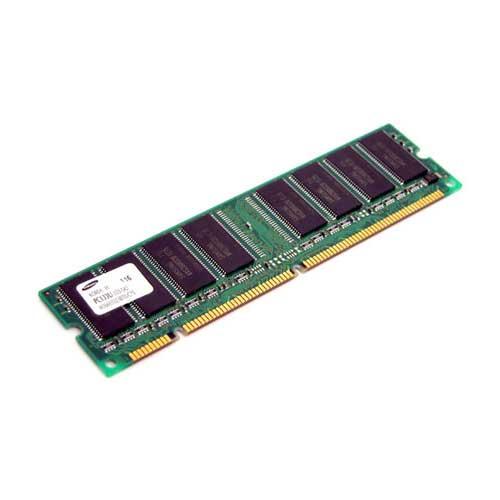
To help identify your RAM modules, your memory looks similiar to this:
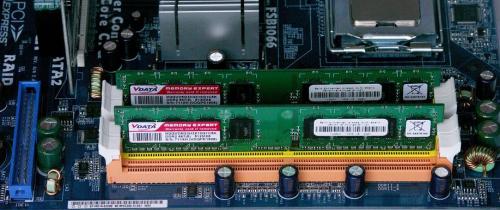
It will be found plugged into your motherboard memory slots like this:
Note: Laptops will be different. Laptops usually have an access cover on the bottom of the computer with a screw or two to remove in order to access the memory.
In order to reseat the RAM, you will need to push the locking clips on the sides outward and down to remove the RAM. Once the RAM is removed you can push it gently back into the slot causing the locking clips on the side to raise and lock the memory into place. There is usually an audible click when the memory locks into place. This procedure may need to be repeated a few times to get a good connection on your RAM. Laptops have similiar locking clips to hold the memory in place. Be sure that you reinsert the RAM in the same direction you removed it. They will only go in one way, and you could break something if you force them in the wrong direction.
- If reseating the RAM does not fix your memory errors then you have bad memory. If you have more than one memory module you can remove one at a time and re-run the tests until you determine exactly which module is bad. You may then replace the defective RAM or run your computer without the bad memory module at the sacrifice of performance. If you have only one module, you will have to replace it.
- Remember that Windows Memory Diagnostic will not fully test memory over 4 gigs, but is still very useful in determining if memory is good or bad, or if there are any loose connections.
- Letting the memory tests run over night will stress test your system components by causing additional heat and load. If there are other hardware failures, your system may reveal them at this time. Your CPU, Motherboard, and Memory will run hotter during the memory tests than what is usual under normal operating conditions. This is ok, and welcome for testing purposes.
- If you are attempting to overclock your computer, Windows Memory Diagnostic can be a great tool to determine the stability of your motherboard settings and help you determine if the overclock settings you are using will work or not.

Edited by appleoddity, 19 June 2009 - 02:37 PM.

