Computer start-up problems
#46

Posted 11 September 2012 - 06:26 PM
Register to Remove
#47

Posted 11 September 2012 - 06:30 PM
press Y then Enter to continue.
Once again as reassurance nothing that is being installed is permanent.
#48

Posted 11 September 2012 - 06:40 PM
Edited by JenneyB, 11 September 2012 - 06:45 PM.
#49

Posted 11 September 2012 - 06:49 PM
after running
sudo apt-get install smartmontools
You pressed Y then Enter.
And it asked you about you about postfix setup?
#50

Posted 11 September 2012 - 06:52 PM
#51

Posted 11 September 2012 - 06:55 PM
Keyboard Shortcut: Ctrl + Alt + T
In that window, copy and paste the following code.
smartctl -t long /dev/sda
Note: This will take some time
#52

Posted 12 September 2012 - 05:55 PM
Bad Hard Drive sectors which may have caused;
Corrupted startup files or drivers
We were also able to determine this issue made using the repair option contained within the installation inaccessible.
Here are the options you have for repairing this issue:
-- Attempt an automated StartUp Repair
-- Did your computer come with a recovery partition? If so this operation can be done from that partition.
-- Do you have access to the recovery disk set for this system? If so this operation can be done from there as well.
-- Attempt a repair installation
-- For this operation we would need a Windows Vista installation disk.
-- Please note that with this method all service packs would have to be re-installed if your installation disk does not come with the service packs that you may have installed.
-- Format and attempt full installation
-- Purchase a new HD and attempt a fresh full installation
Do you have everything you may have wanted on the problem machine backed up?
If not, would you like to perform a backup?
Thank You so much Doug!
Edited by ImaBrokeDude, 12 September 2012 - 07:25 PM.
#53

Posted 13 September 2012 - 02:58 PM
Please do not pm me with questions about your topic. Post your questions here so others may learn. If I do not respond to your thread for a long period then please pm me as real life may have kept me away.
rshaffer61
#54

Posted 13 September 2012 - 03:50 PM
#55

Posted 13 September 2012 - 05:37 PM
Just about mail server configuration type ( and I have no idea how to proceed) but one thing I do see now is that over in the other box the SMART status is green and says disk has a few bad sectors
This here tells me we are dealing with a failing drive issue. That being said the fact is running a chkdsk /r from the command prompt will mark these sectors as bad and keep any future data from being written to the bad areas. This is in no way a fix but only a temporary work around. I highly suggest you start looking at a replacement drive before this one becomes unbootable or loss of data becomes even more serious.
Please do not pm me with questions about your topic. Post your questions here so others may learn. If I do not respond to your thread for a long period then please pm me as real life may have kept me away.
rshaffer61
Register to Remove
#56

Posted 13 September 2012 - 05:40 PM
Edited by JenneyB, 13 September 2012 - 05:41 PM.
#57

Posted 13 September 2012 - 05:44 PM
Edited by JenneyB, 13 September 2012 - 05:47 PM.
#58

Posted 13 September 2012 - 05:49 PM
Please do not pm me with questions about your topic. Post your questions here so others may learn. If I do not respond to your thread for a long period then please pm me as real life may have kept me away.
rshaffer61
#59

Posted 13 September 2012 - 05:54 PM
Edited by JenneyB, 13 September 2012 - 05:56 PM.
#60

Posted 13 September 2012 - 06:46 PM
Use Puppy Linux Live CD to Recover Your Data:
===================
***Required Hardware***
CD Burner (CDRW) Drive,
Blank CD,
Extra Storage Device (USB Flash Drive, External Hard Drive)
===================
1. Save these files to your Desktop/Burn Your Live CD:
- Download Latest Puppy Linux ISO (i.e.: lupu-528.iso)
Download BurnCDCC ISO Burning Software
There are instructions on how to boot from flash drive with puppy here; http://www.pendrivel...e-from-windows/
- Open BurnCDCC with Windows Explorer
- Extract All files to a location you can remember
- Double Click
BurnCDCC
- Click Browse
and navigate to the Puppy Linux ISO file you just downloaded
- Open/Double Click that file
IMPORTANT: Adjust the speed bar to CD: 4x DVD: 1x - Click Start
- Your CD Burner Tray will open automatically
- Insert a blank CD and close the tray
- Click OK
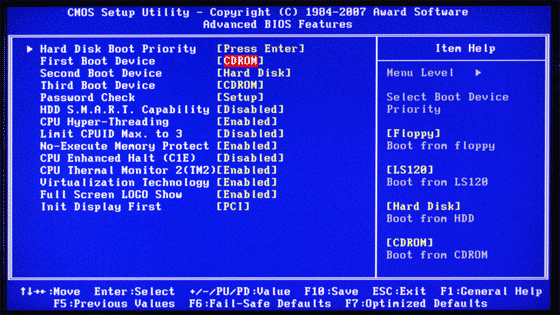
2. Set your boot priority in the BIOS to CD-ROM first, Hard Drive Second
- Start the computer/press the power button
- Immediately start tapping the appropriate key to enter the BIOS, aka "Setup"
(Usually shown during the "Dell" screen, or "Gateway" Screen) - Once in the BIOS, under Advanced BIOS Options change boot priority to:
CD-ROM 1st, Hard Drive 2nd - Open your ROM drive and insert the disk
- Press F10 to save and exit
- Agree with "Y" to continue
- Your computer will restart and boot from the Puppy Linux Live CD

3. Recover Your Data
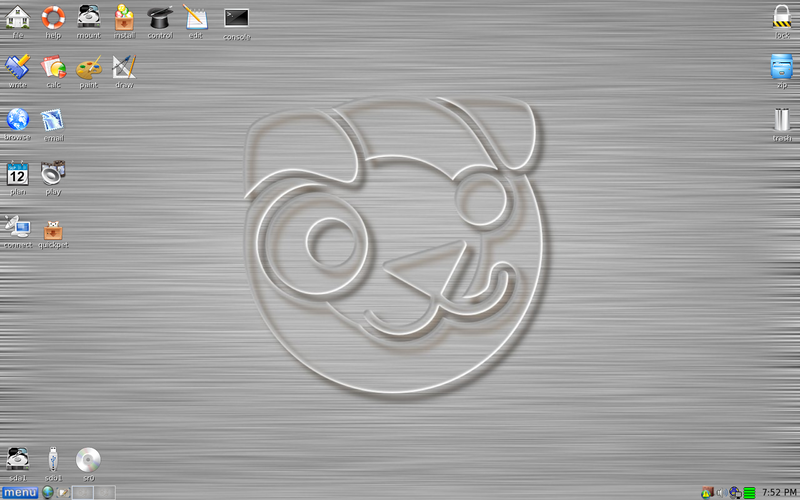
- Once Puppy Linux has loaded, it is actually running in your computer's Memory (RAM). You will see a fully functioning Graphical User Interface similar to what you normally call "your computer". Internet access may or may not be available depending on your machine, so it is recommended you print these instructions before beginning. Also, double clicking is not needed in Puppy. To expand, or open folders/icons, just click once. Puppy is very light on resources, so you will quickly notice it is much speedier than you are used to. This is normal. Ready? Let's get started.
3a. Mount Drives - Click the Mount Icon located at the top left of your desktop.
- A Window will open. By default, the "drive" tab will be forward/highlighted. Click on Mount for your hard drive.
- Assuming you only have one hard drive and/or partition, there may be only one selection to mount.
- USB Flash Drives usually automatically mount upon boot, but click the "usbdrv" tab and make sure it is mounted.
- If using an external hard drive for the data recovery, do this under the "drive" tab. Mount it now.
- At the bottom left of your desktop a list of all hard drives/partitions, USB Drives, and Optical Drives are listed with a familiar looking hard drive icon.
- Open your old hard drive i.e. sda1
- Next, open your USB Flash Drive or External Drive. i.e. sdc or sdb1
- If you open the wrong drive, simply X out at the top right corner of the window that opens. (Just like in Windows)
- From your old hard drive, drag and drop whatever files/folders you wish to transfer to your USB Drive's Window.
Remember to only click once! No double clicking! Once you drag and drop your first folder, you will notice a small menu will appear giving you the option to move or copy. Choose COPY each time you drag and drop.
YOU ARE DONE!!! Simply click Menu >> Mouse Over Shutdown >> Reboot/Turn Off Computer. Be sure to plug your USB Drive into another working windows machine to verify all data is there and transferred without corruption. Congratulations!

If you're doing this to recover from a virus or malware infection, (or even if you're not), DO NOT copy executable files (.exe, .scr. etc...) if any of these files are infected you could be copying the corruption over to any new device/computer. just copy documents, pictures, music, or videos.
Please do not pm me with questions about your topic. Post your questions here so others may learn. If I do not respond to your thread for a long period then please pm me as real life may have kept me away.
rshaffer61
0 user(s) are reading this topic
0 members, 0 guests, 0 anonymous users


